Unlock Efficiency: Master SSH password-less login on Linux systems
Tired of typing your password every single time you connect to your Linux server? Imagine a world where you can log in instantly, securely, and without ever tou


Tired of typing your password every single time you connect to your Linux server? Imagine a world where you can log in instantly, securely, and without ever touching your keyboard. This isn't a fantasy; it's the power of SSH passwordless login, and it's easier to set up than you think.
Introduction: Streamline Your Remote Access
SSH (Secure Shell) is the backbone of remote Linux administration, offering a secure channel over an unsecured network. While crucial for security, the constant password prompts can become a major bottleneck in your workflow. Setting up passwordless login using SSH keys not only significantly boosts your productivity but also enhances security by replacing weak, memorable passwords with strong, cryptographic keys. Let's dive in and transform your remote access experience.
This guide will walk you through the process, making your Linux system interactions smoother and more secure.
Why Go Passwordless? The Benefits of SSH Keys
Moving away from passwords for SSH logins offers compelling advantages beyond just convenience.
- Enhanced Security: SSH keys are cryptographically strong, making them far more difficult to brute-force than typical passwords. They provide a much higher level of security.
- Unmatched Convenience: Say goodbye to repetitive typing. Log in instantly without manual password entry, saving precious time on frequent connections.
- Seamless Automation: Essential for scripting and automated tasks, SSH keys allow your scripts to connect to remote servers without human intervention, ideal for deployment or backups.
- Reduced Human Error: No more forgotten passwords or lockout situations due to multiple failed login attempts.
Understanding SSH Keys: Public and Private
SSH passwordless login relies on a pair of cryptographic keys: a public key and a private key. Understanding their roles is fundamental.
- Private Key: This key is your secret. It resides on your local machine (your workstation) and must be kept absolutely secure. Never share your private key with anyone.
- Public Key: This key is meant to be shared. You copy it to the remote server(s) you want to access. When you try to connect, the remote server uses your public key to verify your identity.
Think of it like a lock and key. Your private key is your unique key. Your public key is a specific lock that only your key can open. You put this lock on the remote server's door. When you try to enter, the server checks if your key fits its lock.

Step-by-Step Guide: Setting Up Passwordless SSH Login
Follow these steps carefully to configure SSH passwordless login from your local machine to your remote Linux server.
Step 1: Generate Your SSH Key Pair (Local Machine)
First, you need to create your private and public key pair on your local machine. Open your terminal and run the following command:
ssh-keygen -t rsa -b 4096Let's break down the command:
-t rsa: Specifies the type of key to create (RSA is a common and secure choice).-b 4096: Sets the key length to 4096 bits, providing a very strong level of encryption.
The utility will prompt you with a few questions:
Enter file in which to save the key (/home/youruser/.ssh/id_rsa):
You can press Enter to accept the default location. It's usually best to keep it there.
Enter passphrase (empty for no passphrase):
This is crucial. For true passwordless login, you can leave this empty by pressing Enter twice. However, for enhanced security, especially if your local machine might be compromised, entering a strong passphrase is recommended. If you use a passphrase, you'll need to enter it once per session (or use ssh-agent, which we'll touch on later).
After generation, you'll see output confirming the keys have been created, typically in ~/.ssh/id_rsa (private key) and ~/.ssh/id_rsa.pub (public key).
Step 2: Copy Your Public Key to the Remote Server
Now that you have your key pair, the next step is to copy your public key to the remote Linux server you wish to access. The server will store it in a file called authorized_keys within the ~/.ssh/ directory of your user account.
Method A: Using ssh-copy-id (Recommended)
This is the easiest and most reliable method. ssh-copy-id automates the process of copying your public key and setting the correct permissions on the remote server.
ssh-copy-id username@remote_host_ip_or_domainReplace username with your actual username on the remote server and remote_host_ip_or_domain with the server's IP address or hostname.
The first time you run this, it will ask for your remote server's password to establish the connection and copy the key. You might also be asked to confirm the server's fingerprint.
Upon successful execution, you should see output indicating that the key has been added.
Method B: Manual Copy (If ssh-copy-id is not available)
If for some reason ssh-copy-id isn't installed or working, you can manually copy your public key. This involves a few more steps and requires careful attention to file permissions.
First, display your public key on your local machine:
cat ~/.ssh/id_rsa.pubCopy the entire output (it will look like a long string starting with ssh-rsa AAAA...).
Now, SSH into your remote server using your password:
ssh username@remote_host_ip_or_domainOnce logged in, create the .ssh directory if it doesn't exist, and set the correct permissions:
mkdir -p ~/.ssh
chmod 700 ~/.ssh
Then, append your copied public key to the authorized_keys file. If the file doesn't exist, this command will create it. Use echo and then redirect to append, or use a text editor.
echo "YOUR_PUBLIC_KEY_STRING_HERE" >> ~/.ssh/authorized_keysImportant: Replace "YOUR_PUBLIC_KEY_STRING_HERE" with the actual public key string you copied earlier. Ensure it is enclosed in double quotes.
Finally, set the correct permissions for the authorized_keys file:
chmod 600 ~/.ssh/authorized_keysThe .ssh directory must have 700 permissions (read, write, execute for owner only), and the authorized_keys file must have 600 permissions (read, write for owner only). Incorrect permissions are a common cause of passwordless login failures.
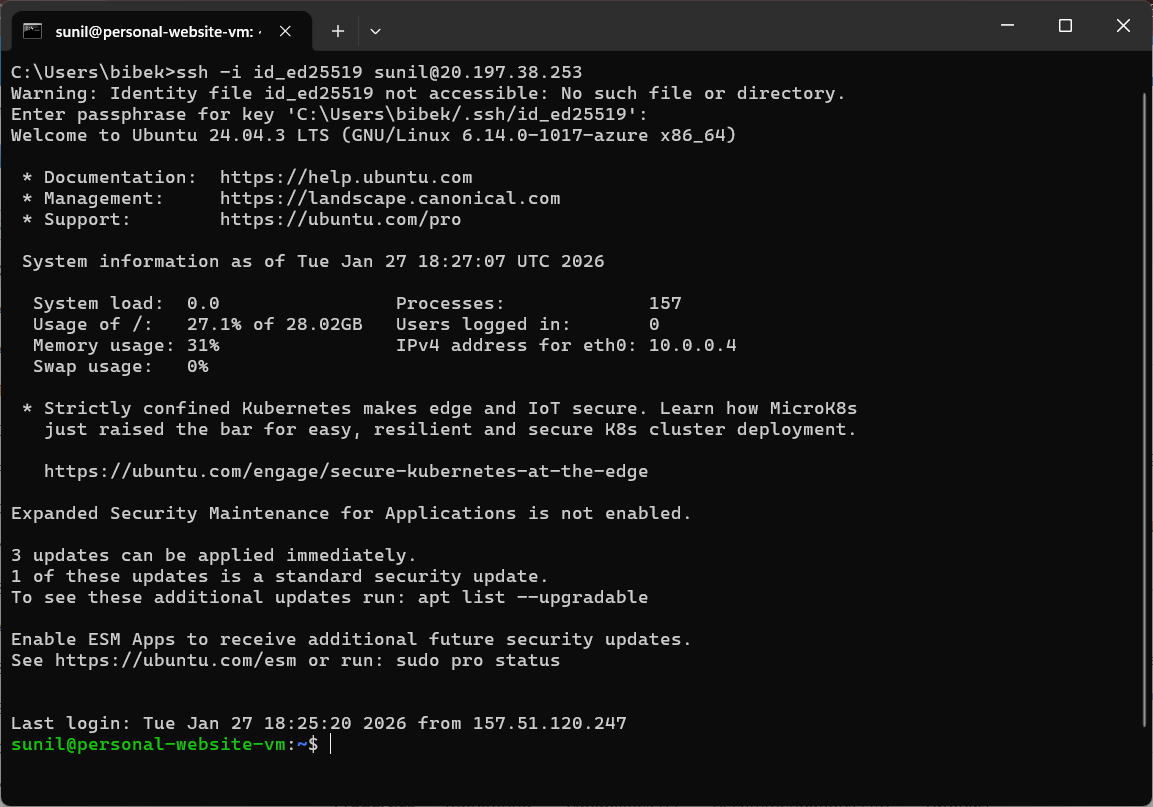
Step 3: Test Your Passwordless Login
After successfully copying your public key to the remote server, it's time to test your new passwordless setup. Log out of your remote server if you are still connected.
From your local machine, try to connect again:
ssh username@remote_host_ip_or_domainIf everything is configured correctly, you should be logged into your remote server instantly, without being prompted for a password. Congratulations!
Pro Tips for SSH Key Management
To maximize security and convenience, consider these advanced tips for managing your SSH keys.
- Use a Passphrase with
ssh-agent: If you chose a passphrase for your private key,ssh-agentcan store it in memory for your current session, so you only type it once. - Secure Your Private Key: The private key is paramount. Ensure its permissions are strictly
600(chmod 600 ~/.ssh/id_rsa) and never share it. - Multiple Keys for Different Servers: For different environments or security policies, you might generate different key pairs (e.g.,
id_rsa_dev,id_rsa_prod). Usessh-addor specify the key withssh -i ~/.ssh/id_rsa_dev user@host. - Disable Password Authentication on Server: Once passwordless login is working flawlessly, consider disabling password authentication on your remote server's SSH configuration (
/etc/ssh/sshd_config) for enhanced security. Remember to enablePubkeyAuthentication yesand restart the SSH service.
Conclusion: Your Gateway to Seamless Remote Control
You've now successfully configured SSH passwordless login, unlocking a faster, more secure way to manage your Linux systems. Say goodbye to tedious password prompts and hello to seamless, instant access. This fundamental setup is a game-changer for anyone working with remote servers, enhancing both security posture and daily productivity.
Try this setup today and experience the difference! Have you encountered any challenges or have a favorite SSH tip to share? Share your insights and questions in the comments below – let's build a more efficient and secure computing community!